Comprehensive Guide to Implementing Stripe Payments in a React Application

This in-depth tutorial provides a detailed, step-by-step guide to integrating Stripe payments into a React application with a Node.js/Express backend. We'll cover everything from project setup to advanced features, security considerations, and common pitfalls, ensuring you have a robust, secure, and user-friendly payment system. We'll also address nuances and best practices to avoid common mistakes.
Prerequisites
Before diving in, ensure you have the following:
- Node.js (v16 or higher) and npm installed. Verify with node -v and npm -v.
- A Stripe account. Sign up at stripe.com and obtain your API keys from the Stripe Dashboard.
- Basic knowledge of React, Express, and REST APIs.
- A code editor like VS Code.
- Familiarity with Git for version control (optional but recommended).
- Postman or a similar tool for testing API endpoints.
Nuance: Stripe provides test and live API keys. Always use test keys (sk_test_... and pk_test_...) during development to avoid accidental charges.
Project Structure
Organize your project with separate backend and frontend directories to maintain a clean separation of concerns:
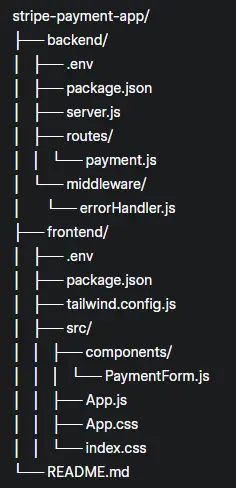
- The routes and middleware directories in the backend help modularize the code for scalability.
- Use a .gitignore file to exclude node_modules, .env, and build artifacts from version control.
Setting Up Environment Variables
Environment variables are critical for securely storing sensitive information like API keys. Create two separate .env files for the backend and frontend.
        STRIPE_SECRET_KEY=sk_test_your_stripe_secret_key
        PORT=5000
        FRONTEND_URL=http://localhost:3000
- STRIPE_SECRET_KEY: Your Stripe test secret key from the Stripe Dashboard.
- PORT: The port for the backend server.
- FRONTEND_URL: The frontend URL for CORS configuration.
        REACT_APP_STRIPE_PUBLISHABLE_KEY=pk_test_your_stripe_publishable_key
        REACT_APP_API_URL=http://localhost:5000
- REACT_APP_STRIPE_PUBLISHABLE_KEY: Your Stripe test publishable key.
- REACT_APP_API_URL: The backend API base URL.
- Prefix Requirement: React requires environment variables to start with REACT_APP_ to be accessible in the app.
- Security: Never commit .env files to Git. Add .env to .gitignore.
- Validation: Ensure keys are copied correctly from the Stripe Dashboard, as typos cause authentication errors.
- Restart: Restart your servers after updating .env files to load new values.
Backend Setup
The backend handles payment intent creation and communicates with Stripe's API.
Navigate to the backend directory:
        cd backend
        npm init -y
Install dependencies:
npm install express stripe dotenv cors helmet
- express: Web framework for Node.js.
- stripe: Stripe's Node.js library.
- dotenv: Loads environment variables from .env.
- cors: Enables Cross-Origin Resource Sharing.
- helmet: Adds security headers.
        const errorHandler = (err, req, res, next) => {
          console.error(err.stack);
          res.status(500).json({
            error: {
              message: err.message || 'Internal Server Error',
              status: err.status || 500,
            },
          });
        };

        module.exports = errorHandler;
Nuance: Centralized error handling improves maintainability and provides consistent error responses.
        const express = require('express');
        const Stripe = require('stripe');
        const router = express.Router();

        const stripe = Stripe(process.env.STRIPE_SECRET_KEY);

        // Create Payment Intent
        router.post('/create-payment-intent', async (req, res, next) => {
          try {
            const { amount, currency = 'usd' } = req.body;

            // Validate input
            if (!amount || amount < 1) {
              return res.status(400).json({ error: 'Invalid amount' });
            }

            const paymentIntent = await stripe.paymentIntents.create({
              amount: amount * 100, // Convert to cents
              currency,
              payment_method_types: ['card'],
              description: 'Example payment',
              metadata: { order_id: '12345' }, // Optional: Add metadata for tracking
            });

            res.json({
              clientSecret: paymentIntent.client_secret,
              paymentIntentId: paymentIntent.id,
            });
          } catch (error) {
            next(error); // Pass to error handler
          }
        });

        module.exports = router;
- Amount Conversion: Stripe expects amounts in cents, so multiply by 100.
- Input Validation: Check for valid amounts to prevent errors.
- Metadata: Useful for tracking orders or debugging.
        const express = require('express');
        const cors = require('cors');
        const helmet = require('helmet');
        require('dotenv').config();

        const paymentRoutes = require('./routes/payment');
        const errorHandler = require('./middleware/errorHandler');

        const app = express();

        // Middleware
        app.use(helmet());
        app.use(cors({ origin: process.env.FRONTEND_URL }));
        app.use(express.json());

        // Routes
        app.use('/api', paymentRoutes);

        // Error Handling
        app.use(errorHandler);

        const PORT = process.env.PORT || 5000;
        app.listen(PORT, () => {
          console.log(`Server running on port ${PORT}`);
        });
- Helmet: Adds security headers to protect against common vulnerabilities.
- CORS: Restrict to the frontend URL for security.
- Modular Routes: Keeps the codebase scalable.
Frontend Setup
The frontend handles the payment form and communicates with the backend and Stripe.
Create a rspack app in the frontend directory:
        npx create rspack@latest
        cd frontend
Install dependencies:
npm install @stripe/stripe-js @stripe/react-stripe-js axios
        import React, { useState, useEffect } from 'react';
        import { CardElement, useStripe, useElements } from '@stripe/react-stripe-js';
        import axios from 'axios';

        const PaymentForm = ({ amount, currency = 'usd', onSuccess, onError }) => {
          const stripe = useStripe();
          const elements = useElements();
          const [error, setError] = useState(null);
          const [processing, setProcessing] = useState(false);
          const [succeeded, setSucceeded] = useState(false);
          const [clientSecret, setClientSecret] = useState(null);

          // Fetch Payment Intent on mount
          useEffect(() => {
            const fetchPaymentIntent = async () => {
              try {
                const { data } = await axios.post(
                  `${process.env.REACT_APP_API_URL}/api/create-payment-intent`,
                  { amount, currency }
                );
                setClientSecret(data.clientSecret);
              } catch (error) {
                setError('Failed to initialize payment');
                onError?.(error);
              }
            };
            fetchPaymentIntent();
          }, [amount, currency, onError]);

          const handleSubmit = async (event) => {
            event.preventDefault();
            setProcessing(true);

            if (!stripe || !elements || !clientSecret) {
              setError('Payment system not initialized');
              setProcessing(false);
              return;
            }

            try {
              const result = await stripe.confirmCardPayment(clientSecret, {
                payment_method: {
                  card: elements.getElement(CardElement),
                  billing_details: {
                    name: 'Customer Name', // Replace with form input
                    email: 'customer@example.com', // Replace with form input
                  },
                },
              });

              if (result.error) {
                setError(result.error.message);
                onError?.(result.error);
                setProcessing(false);
              } else if (result.paymentIntent.status === 'succeeded') {
                setError(null);
                setProcessing(false);
                setSucceeded(true);
                onSuccess?.(result.paymentIntent);
              }
            } catch (error) {
              setError('Payment failed');
              onError?.(error);
              setProcessing(false);
            }
          };

          const cardStyle = {
            style: {
              base: {
                color: '#32325d',
                fontFamily: '"Helvetica Neue", Helvetica, sans-serif',
                fontSmoothing: 'antialiased',
                fontSize: '16px',
                '::placeholder': { color: '#aab7c4' },
              },
              invalid: {
                color: '#fa755a',
                iconColor: '#fa755a',
              },
            },
          };

          return (
            <div className="max-w-lg mx-auto mt-10 p-8 bg-white rounded-xl shadow-lg">
              <h2 className="text-3xl font-bold mb-6 text-gray-800">Complete Your Payment</h2>
              <form onSubmit={handleSubmit} className="space-y-6">
                <div className="border border-gray-200 p-4 rounded-lg">
                  <CardElement options={cardStyle} />
                </div>
                <button
                  type="submit"
                  disabled={processing || !stripe || !elements || !clientSecret}
                  className={`w-full py-3 px-4 rounded-lg text-white font-semibold transition-colors ${
                    processing || !stripe || !elements || !clientSecret
                      ? 'bg-gray-400 cursor-not-allowed'
                      : 'bg-blue-600 hover:bg-blue-700'
                  }`}
                >
                  {processing ? 'Processing...' : `Pay $${amount}`}
                </button>
                {error && <div className="text-red-600 text-sm">{error}</div>}
                {succeeded && (
                  <div className="text-green-600 text-sm font-medium">
                    Payment succeeded! Thank you for your purchase.
                  </div>
                )}
              </form>
            </div>
          );
        };

        export default PaymentForm;
- Early Payment Intent: Fetch the Payment Intent on component mount to reduce latency during submission.
- Props: Accept onSuccess and onError callbacks for better integration.
- Billing Details: Collect real user data (e.g., via a form) for better Stripe records.
- State Management: Handle loading, error, and success states for a smooth UX.
        import React from 'react';
        import { loadStripe } from '@stripe/stripe-js';
        import { Elements } from '@stripe/react-stripe-js';
        import PaymentForm from './components/PaymentForm';

        const stripePromise = loadStripe(process.env.REACT_APP_STRIPE_PUBLISHABLE_KEY);

        function App() {
          const amount = 15.99; // Example amount in dollars
          const currency = 'usd';

          const handleSuccess = (paymentIntent) => {
            console.log('Payment succeeded:', paymentIntent);
            // Redirect or update UI
          };

          const handleError = (error) => {
            console.error('Payment failed:', error);
            // Show user-friendly error
          };

          return (
            <div className="min-h-screen bg-gray-100 flex items-center justify-center">
              <Elements stripe={stripePromise}>
                <PaymentForm
                  amount={amount}
                  currency={currency}
                  onSuccess={handleSuccess}
                  onError={handleError}
                />
              </Elements>
            </div>
          );
        }

        export default App;
Nuance: Wrap PaymentForm in Elements to provide Stripe context.
/* Tailwind imports handled in index.css */
6. Styling with Tailwind CSS
Tailwind CSS provides a utility-first approach for rapid, responsive styling.
        npm install -D tailwindcss
        npx tailwindcss init
        /** @type {import('tailwindcss').Config} */
        module.exports = {
          content: [
            './src/**/*.{js,jsx,ts,tsx}',
          ],
          theme: {
            extend: {
              colors: {
                'stripe-blue': '#6772e5',
              },
            },
          },
          plugins: [],
        };
        import React from 'react';
        import ReactDOM from 'react-dom/client';
        import './index.css';
        import App from './App';

        const root = ReactDOM.createRoot(document.getElementById('root'));
        root.render(
          <React.StrictMode>
            <App />
          </React.StrictMode>
        );
Nuance: Ensure Tailwind is imported globally to apply styles across components.
7. Running the Application
Start the Backend:
        cd backend
        npm start
Start the Frontend (in a new terminal):
        cd frontend
        npm run dev
Nuance: Run both servers concurrently. If ports conflict, update the .env files or use a tool like 'concurrently' to manage multiple scripts.
8. Security Best Practices
- HTTPS: Use HTTPS in production to encrypt data in transit.
- Input Validation: Validate all inputs on the backend to prevent injection attacks.
- CORS: Restrict CORS to trusted origins.
- Stripe Webhooks: Use webhooks to verify payment status server-side.
- PCI Compliance: Follow Stripe's guidelines to avoid storing sensitive card data.
- Rate Limiting: Implement rate limiting to prevent abuse.
- Secrets Management: Use a secrets manager (e.g., AWS Secrets Manager) in production.
Nuance: Never log sensitive data (e.g., card details or secret keys) to the console.
9. Testing and Debugging
Use Stripe's test cards:
- Success: 4242 4242 4242 4242, any future expiry, any CVC.
- Declined: 4000 0000 0000 0002.
- 3D Secure: 4000 0000 0000 3220.
- See Stripe's testing docs for more.
- Check Environment Variables: Ensure .env files are loaded correctly.
- Network Tab: Use browser dev tools to monitor API requests.
- Stripe Dashboard: View logs for payment attempts.
- Console Logs: Add temporary logs to trace data flow (remove in production).
- Postman: Test the /create-payment-intent endpoint directly.
Nuance: If payments fail, verify the client secret and ensure the frontend and backend are on the same currency.
10. Advanced Features
Save customers in Stripe for recurring payments:
        // backend/routes/payment.js
        router.post('/create-customer', async (req, res, next) => {
          try {
            const { email, name } = req.body;
            const customer = await stripe.customers.create({ email, name });
            res.json({ customerId: customer.id });
          } catch (error) {
            next(error);
          }
        });
Add subscription support:
        // backend/routes/payment.js
        router.post('/create-subscription', async (req, res, next) => {
          try {
            const { customerId, priceId } = req.body;
            const subscription = await stripe.subscriptions.create({
              customer: customerId,
              items: [{ price: priceId }],
            });
            res.json(subscription);
          } catch (error) {
            next(error);
          }
        });
Handle asynchronous events (e.g., payment confirmation):
        // backend/routes/payment.js
        router.post('/webhook', express.raw({ type: 'application/json' }), (req, res) => {
          const sig = req.headers['stripe-signature'];
          try {
            const event = stripe.webhooks.constructEvent(
              req.body,
              sig,
              'your_webhook_secret'
            );
            if (event.type === 'payment_intent.succeeded') {
              // Update order status
            }
            res.json({ received: true });
          } catch (error) {
            res.status(400).json({ error: error.message });
          }
        });
Nuance: Webhooks require a publicly accessible URL. Use tools like ngrok for local testing.
11. Common Pitfalls and Solutions
- Issue: 'Invalid client secret' error.
- Solution: Verify the Stripe secret key and ensure the Payment Intent was created successfully.
- Issue: CORS errors.
- Solution: Check the FRONTEND_URL in the backend .env and ensure it matches the frontend origin.
- Issue: Card element not rendering.
- Solution: Ensure stripePromise is passed to <Elements>.
- Issue: Environment variables not loading.
- Solution: Restart the server after updating .env and verify the file path.
- Issue: Payments succeed but UI doesn't update.
- Solution: Ensure state updates (e.g., setSucceeded) are triggered correctly.
Nuance: Always test edge cases, like network failures or invalid card details.
12. Conclusion
This guide provides a comprehensive, secure, and scalable implementation of Stripe payments in a React application. By following these steps, you can create a robust payment system with a polished user experience. Extend the functionality with subscriptions, customer management, or webhooks based on your needs, and always prioritize security.
For further details, refer to:
- Stripe Documentation
- React Stripe.js Documentation
- Tailwind CSS Documentation