How to Go Live with Your Chrome Extension Using React and Rspack
Creating a Chrome Extension with React is a great way to build powerful, interactive browser tools. In this guide, you'll learn step-by-step how to turn your React + Rspack project into a live Chrome extension that runs directly in your browser.
What You'll Need
- A React app built using Rspack
- Chrome installed on your computer
- Basic understanding of file structure
- Ready-to-use icons in sizes 16x16, 48x48, and 128x128
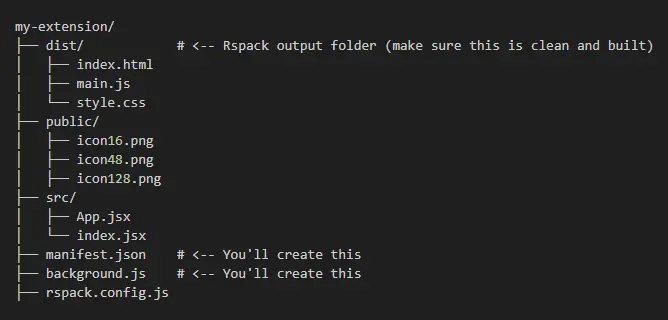
Step 1: Structure Your React + Rspack Project
Let's assume your Rspack project looks like this after build:
Step 2: Create the manifest.json
This is the heart of your Chrome Extension. Place it in the root of your project:xt
        {
          "manifest_version": 3,
          "name": "My React Extension",
          "version": "1.0",
          "description": "A Chrome Extension built with React + Rspack",
          "action": {
            "default_popup": "index.html",
            "default_icon": {
              "16": "public/icon16.png",
              "48": "public/icon48.png",
              "128": "public/icon128.png"
            }
          },
          "background": {
            "service_worker": "background.js"
          },
          "permissions": [],
          "icons": {
            "16": "public/icon16.png",
            "48": "public/icon48.png",
            "128": "public/icon128.png"
          }
        }
- 'manifest_version: 3' is required for current Chrome support.
- 'action.default_popup' defines a popup when you click the extension icon.
- 'background.service_worker' handles background tasks.
- 'icons' define how your extension looks in different places.
Step 3: Create background.js
In your root, create background.js:
        chrome.runtime.onInstalled.addListener(() => {
          console.log("Extension installed!");
        });
You can expand this file to listen to tabs, alarms, or perform other tasks in the background.
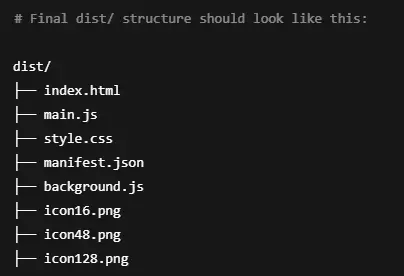
Step 4: Build Your Rspack Project
Before loading your extension, make sure your project is built:
npx rspack build
This will generate the dist/ folder. Move your manifest.json, background.js, and icons into the dist/ folder so that everything is bundled and ready.
Step 5: Load the Extension in Chrome
- Open Chrome and go to chrome://extensions
- Enable Developer Mode (top right)
- Click 'Load unpacked'
- Select your dist/ folder
Step 6: Choose How the Extension Appears
There are different ways to use your React app:
- Automatically appears when clicking the extension icon
- Use default_popup in manifest.json
You can add a browser action that opens a tab:
        "action": {
          "default_title": "Open My Extension",
          "default_icon": {
            "16": "icon16.png",
            "48": "icon48.png",
            "128": "icon128.png"
          }
        }
Then modify your background.js:
        chrome.action.onClicked.addListener(() => {
          chrome.tabs.create({ url: "index.html" });
        });
This way, clicking the extension opens a full page instead of a small popup.
Cleaning Up & Best Practices
- Make sure to remove any third-party trackers unless you handle them through allowed APIs.
- Always minify and optimize your production build.
- Use proper icons to avoid layout glitches in Chrome.
- Keep your manifest.json and background.js in sync with what you build.
Going Live
Chrome Web Store no longer allows real-time publishing without a developer account. Once you are ready:
- Go to: https://chrome.google.com/webstore/devconsole
- Pay the one-time developer registration fee.
- Upload a ZIP file of your dist/ folder.
- Wait for approval.
Final Thoughts
Building a Chrome Extension with React + Rspack is fun, fast, and modern. Just remember:
- Use manifest.json to configure your extension.
- Bundle and place everything inside dist/.
- Keep third-party services out.
- Load or publish through Chrome Developer Tools or Dashboard.
Need help with bundling, Rspack setup, or publishing tips? Let me know and I’ll be happy to expand this guide with your questions!