Building a ChatGPT Powered React App with Rspack: A Step-by-Step Guide

Integrating AI like ChatGPT into a web application can transform user experiences, enabling dynamic, conversational interfaces. In this guide, we'll walk through creating a React application powered by OpenAI's ChatGPT, using Rspack for blazing-fast builds. Instead of overwhelming you with monolithic code blocks, we'll break down each component, explain its purpose, and build the app piece by piece. This tutorial is designed to be engaging and informative, perfect for sharing with developers eager to learn how to add AI to their projects.
Why ChatGPT and Rspack?
ChatGPT, built by OpenAI, offers natural language understanding that can make your app feel alive. Pairing it with Rspack—a high-performance bundler written in Rust—ensures your development process is fast and efficient. Rspack's speed surpasses traditional tools like Create React App, making it ideal for modern web projects.
Before we start, you'll need:
- Basic React and JavaScript knowledge
- Node.js (16+) and npm installed
- An OpenAI API key (get one here)
- A code editor (e.g., VS Code)
Let's dive in!
Step 1: Setting Up the Project with Rspack
First, create a new project directory and initialize it.
        mkdir chatgpt-react-app
        cd chatgpt-react-app
        npm init -y
Install Rspack and core dependencies.
npm install @rspack/cli @rspack/core react react-dom axios
npm install --save-dev @types/react @types/react-dom style-loader css-loader
Why axios? It simplifies HTTP requests to the OpenAI API. The style and CSS loaders handle our app's styling.
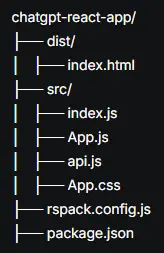
Create the project structure.
Step 2: Connecting to ChatGPT
To interact with ChatGPT, we need to call OpenAI's API. Let's create src/api.js to handle this.
Start with the basic setup:
        import axios from 'axios';

        const API_KEY = process.env.OPENAI_API_KEY || 'YOUR_OPENAI_API_KEY';
        const API_URL = 'https://api.openai.com/v1/chat/completions';

        const openaiApi = axios.create({
          baseURL: API_URL,
          headers: {
            'Content-Type': 'application/json',
            'Authorization': `Bearer ${API_KEY}`
          },
          timeout: 30000
        });
This configures axios with the API endpoint and key. Using an environment variable for the API key keeps it secure—create a .env file later with REACT_APP_OPENAI_API_KEY=your-key.
Now, add the function to send messages:
        export const sendMessageToChatGPT = async (message, previousMessages = []) => {
          const messages = [
            { role: 'system', content: 'You are a helpful assistant.' },
            ...previousMessages,
            { role: 'user', content: message }
          ];

          try {
            const response = await openaiApi.post('', {
              model: 'gpt-3.5-turbo',
              messages,
              temperature: 0.7,
              max_tokens: 1000
            });

            if (response.data?.choices?.[0]?.message) {
              return response.data.choices[0].message.content.trim();
            }
            throw new Error('Invalid response from OpenAI API');
          } catch (error) {
            if (error.response?.status === 401) {
              throw new Error('Invalid or expired API key');
            } else if (error.response?.status === 429) {
              throw new Error('Rate limit exceeded. Try again later.');
            } else if (error.request) {
              throw new Error('No response from OpenAI. Check your connection.');
            }
            throw error;
          }
        };
- Message Structure: We send a system prompt to define ChatGPT's behavior, followed by the user's message and any conversation history.
- Model Choice: gpt-3.5-turbo is cost-effective and fast for chat.
- Model Choice: gpt-3.5-turbo is cost-effective and fast for chat. Error Handling: We catch specific errors (e.g., rate limits, authentication issues) to provide meaningful feedback.
- Response Parsing: Ensures we get a valid response before returning it.
Add a helper function to check the API key:
        export const isApiKeyConfigured = () => {
          return API_KEY !== 'YOUR_OPENAI_API_KEY' && API_KEY.length > 0;
        };
This prevents running the app with the placeholder key.
Step 3: Crafting the Chat Interface
Let's build the UI in src/App.js. We'll start with the basic component and state management.
        import React, { useState } from 'react';
        import './App.css';

        function App() {
          const [message, setMessage] = useState('');
          const [chatHistory, setChatHistory] = useState([]);
          const [isLoading, setIsLoading] = useState(false);

          return (
            <div className="chat-container">
              <div className="chat-header">
                <h1>ChatGPT</h1>
              </div>
            </div>
          );
        }

        export default App;
We're using state to track the user's input (message), conversation history (chatHistory), and loading state (isLoading). The header sets the stage for our chat app.
Add the message display area:
        <div className="chat-messages">
        {chatHistory.length === 0 ? (
          <div className="empty-state">
            <div className="empty-icon">💬</div>
            <p>How can I help you today?</p>
          </div>
        ) : (
          chatHistory.map((msg, index) => (
            <div key={index} className={`message ${msg.type}`}>
              <div className="message-avatar">
                {msg.type === 'user' ? '👤' : msg.type === 'assistant' ? '🤖' : '⚠️'}
              </div>
              <div className="message-content">{msg.content}</div>
            </div>
          ))
        )}
        {isLoading && (
          <div className="message assistant loading">
            <div className="message-avatar">🤖</div>
            <div className="message-content">
              <span className="typing-indicator">
                <span className="dot"></span>
                <span className="dot"></span>
                <span className="dot"></span>
              </span>
            </div>
          </div>
        )}
      </div>
- Empty State: Shows a friendly prompt when there are no messages.
- Dynamic Messages: Renders user, assistant, and error messages with distinct avatars.
- Loading Feedback: A typing indicator keeps users engaged during API calls.
Now, add the input form:
        import { sendMessageToChatGPT } from './api';

        const handleSubmit = async (e) => {
          e.preventDefault();
          if (!message.trim()) return;

          const userMessage = message;
          setMessage('');
          setIsLoading(true);
          setChatHistory([...chatHistory, { type: 'user', content: userMessage }]);

          try {
            const chatGPTResponse = await sendMessageToChatGPT(userMessage);
            setChatHistory([
              ...chatHistory,
              { type: 'user', content: userMessage },
              { type: 'assistant', content: chatGPTResponse }
            ]);
          } catch (error) {
            setChatHistory([
              ...chatHistory,
              { type: 'user', content: userMessage },
              { type: 'error', content: 'Error: Unable to get response.' }
            ]);
          } finally {
            setIsLoading(false);
          }
        };
        // Inside return, after chat-messages
        <form onSubmit={handleSubmit} className="chat-input-form">
          <textarea
            value={message}
            onChange={(e) => setMessage(e.target.value)}
            placeholder="Type your message here..."
            className="chat-input"
            rows="2"
            onKeyDown={(e) => {
              if (e.key === 'Enter' && !e.shiftKey) {
                e.preventDefault();
                handleSubmit(e);
              }
            }}
          />
          <button
            type="submit"
            className="send-button"
            disabled={isLoading || !message.trim()}
          >
            <span className="send-icon">➤</span>
          </button>
        </form>
- Form Handling: Submits messages via button or Enter key.
- Input Validation: Disables the button for empty inputs.
- Chat Logic: Updates the history with user and assistant messages, or errors if the API fails.
- User Experience: Clears the input after submission and supports multi-line input with Shift+Enter.
Step 4: Styling for Polish
A great UI makes the app inviting. In src/App.css, add styles incrementally.
Start with the container and header:
        .chat-container {
          max-width: 800px;
          margin: 0 auto;
          padding: 20px;
          height: 100vh;
          display: flex;
          flex-direction: column;
          font-family: Arial, sans-serif;
        }

        .chat-header {
          text-align: center;
          padding: 10px 0;
          border-bottom: 1px solid #eee;
        }
Style the messages:
        .chat-messages {
          flex: 1;
          overflow-y: auto;
          padding: 20px 0;
        }

        .empty-state {
          text-align: center;
          color: #666;
          padding: 50px 0;
        }

        .empty-icon {
          font-size: 48px;
          margin-bottom: 10px;
        }

        .message {
          display: flex;
          margin-bottom: 15px;
          align-items: flex-start;
        }

        .message.user {
          justify-content: flex-end;
        }

        .message.assistant {
          justify-content: flex-start;
        }

        .message.error {
          justify-content: flex-start;
          color: #d32f2f;
        }

        .message-avatar {
          font-size: 24px;
          margin: 0 10px;
        }

        .message-content {
          max-width: 70%;
          padding: 10px 15px;
          border-radius: 15px;
          line-height: 1.4;
        }

        .message.user .message-content {
          background-color: #007bff;
          color: white;
        }

        .message.assistant .message-content {
          background-color: #f1f0f0;
          color: #333;
        }

        .message.error .message-content {
          background-color: #ffebee;
        }
Add the input form and loading animation:
        .chat-input-form {
          display: flex;
          padding: 10px 0;
          border-top: 1px solid #eee;
        }

        .chat-input {
          flex: 1;
          padding: 10px;
          border: 1px solid #ddd;
          border-radius: 5px;
          resize: none;
          font-size: 16px;
        }

        .chat-input:focus {
          outline: none;
          border-color: #007bff;
        }

        .send-button {
          margin-left: 10px;
          padding: 0 20px;
          background-color: #007bff;
          color: white;
          border: none;
          border-radius: 5px;
          cursor: pointer;
          display: flex;
          align-items: center;
        }

        .send-button:disabled {
          background-color: #ccc;
          cursor: not-allowed;
        }

        .send-icon {
          font-size: 20px;
        }

        .typing-indicator {
          display: flex;
          align-items: center;
        }

        .dot {
          width: 8px;
          height: 8px;
          background-color: #666;
          border-radius: 50%;
          margin: 0 2px;
          animation: typing 1s infinite;
        }

        .dot:nth-child(2) {
          animation-delay: 0.2s;
        }

        .dot:nth-child(3) {
          animation-delay: 0.4s;
        }

        @keyframes typing {
          0%, 100% {
            transform: translateY(0);
          }
          50% {
            transform: translateY(-5px);
          }
        }
- Flex Layout: Ensures the chat fills the screen and scrolls smoothly.
- Visual Cues: Different colors for user and assistant messages improve readability.
- Animation: The typing dots create a lively waiting experience.
Step 5: Create a .env File
In the root of your project (same level as src), create a file named .env and add your OpenAI API key:
OPENAI_API_KEY=your-actual-openai-api-key-here
Replace your-actual-openai-api-key-here with your real OpenAI API key. Note that Rspack doesn't require a specific prefix like REACT_APP_ (as in Create React App) or VITE_ (as in Vite), but you can use a prefix if you prefer for clarity (e.g., APP_).
Since the .env file contains sensitive information (your API key), make sure it's not committed to version control. Add it to your .gitignore file.
Step 6: Configure Rspack to Inject Environment Variables
Rspack uses a configuration file (typically rspack.config.js) to manage environment variables. You need to explicitly define which environment variables should be injected into the client-side code using the define plugin or a similar mechanism.
If you don't already have an rspack.config.js in your project root, create one. Then, configure it to expose the OPENAI_API_KEY variable:
        // rspack.config.js
        const { DefinePlugin } = require('@rspack/core');
        const dotenv = require('dotenv');

        // Load environment variables from .env file
        dotenv.config();

        module.exports = {
          // Other Rspack configurations...
          plugins: [
            new DefinePlugin({
              'process.env.OPENAI_API_KEY': JSON.stringify(process.env.OPENAI_API_KEY || 'YOUR_OPENAI_API_KEY'),
            }),
          ],
        };
- The dotenv package loads variables from the .env file into process.env during the build process.
- The DefinePlugin injects the specified environment variables into the client-side bundle, making process.env.OPENAI_API_KEY available in your JavaScript code.
- The fallback 'YOUR_OPENAI_API_KEY' ensures that if the environment variable is not set, the code won't break (though it will still fail to authenticate with OpenAI).
Install dotenv if you haven't already.
npm install dotenv
Step 7: Running and Testing
Run the app:
npm run dev
Visit http://localhost:8080. Try typing messages like “Tell me a joke” or “Explain quantum physics.” You should see:
- Your message appear on the right.
- A typing indicator while ChatGPT responds.
- The assistant's reply on the left.
Test edge cases:
- Empty messages (button should be disabled).
- Invalid API key (set API_KEY to a random string).
- Long conversations to ensure scrolling works.
Step 8: Deployment and Security
To deploy, build the app.
npm run build
Upload the dist/ folder to a hosting service like Vercel or Netlify.
- API Key: In production, proxy API calls through a backend to hide the key.
- Rate Limits: The error handling in api.js helps, but monitor usage with OpenAI's dashboard.
- Input Sanitization: For production, validate inputs to prevent misuse.
Taking It Further
Enhance the app with:
- Persistent History: Save chats in local storage.
- Custom Prompts: Let users tweak ChatGPT's behavior.
- Accessibility: Add ARIA roles for screen readers.
Why This Matters
This project showcases how easy it is to integrate AI into modern web apps. Rspack's speed makes development a breeze, while ChatGPT's conversational power engages users. Share this guide to inspire others to build AI-driven interfaces!